- Cloud Monitoring
- Cloud Functions
- Monitor and Manage Google Cloud Resources
✅ Cloud Monitoring
[ Create an uptime check ]
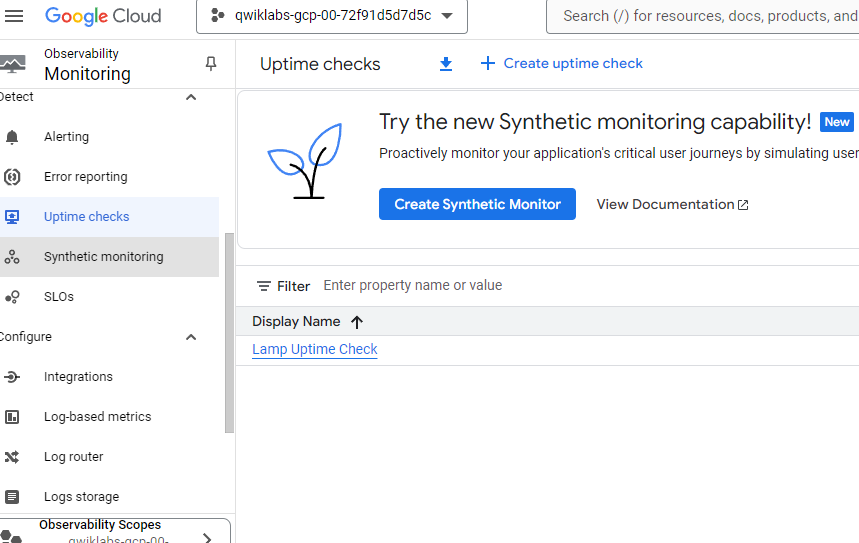
Uptime checks verify that a resource is always accessible. For practice, create an uptime check to verify your VM is up.
- In the Cloud Console, in the left menu, click Uptime checks, and then click Create Uptime Check.
- For Protocol, select HTTP.
- For Resource Type, select Instance.
- For Instance, select lamp-1-vm.
- For Check Frequency, select 1 minute.
- Click Continue.
- In Response Validation, accept the defaults and then click Continue.
- In Alert & Notification, accept the defaults, and then click Continue.
- For Title, type Lamp Uptime Check.
- Click Test to verify that your uptime check can connect to the resource.
- When you see a green check mark everything can connect.
- Click Create.

[ Create a dashboard and chart ]
You can display the metrics collected by Cloud Monitoring in your own charts and dashboards. In this section you create the charts for the lab metrics and a custom dashboard.
- In the left menu select Dashboards, and then +Create Dashboard.
- Name the dashboard Cloud Monitoring LAMP Qwik Start Dashboard.
Add the first chart
- Click on + ADD WIDGET
- Select the Line option under Visualization in the Add widget.
- Name the Widget title CPU Load.
- Click on Select a metric dropdown. Uncheck the Active.
- Type CPU load (1m) in filter by resource and metric name and click on VM instance > Cpu. Select CPU load (1m) and click Apply. Leave all other fields at the default value. Refresh the tab to view the graph.
Add the second chart
- Click + Add WIDGET and select Line option under Visualization in the Add widget.
- Name this Widget title Received Packets.
- Click on Select a metric dropdown. Uncheck the Active.
- Type Received packets in filter by resource and metric name and click on VM instance > Instance. Select Received packets and click Apply. Refresh the tab to view the graph.
- Leave the other fields at their default values. You see the chart data.

✅ Cloud Functions
A cloud function is a piece of code that runs in response to an event, such as an HTTP request, a message from a messaging service, or a file upload. Cloud events are things that happen in your cloud environment.
Since cloud functions are event-driven, they only run when something happens. This makes them a good choice for tasks that need to be done quickly or that don't need to be running all the time.
[ Create a function ]
In this step, you're going to create a cloud function using the console.
- In the console, on the Navigation menu click VIEW ALL PRODUCTS and click Serverless > Cloud Run functions.
- Click Create function.
- In the Create function dialog, enter the following values:
| Field | Value |
| Environment | Cloud Run function |
| Function name | GCFunction |
| Region | us-central1 |
| Trigger type | HTTPS |
| Authentication | Allow unauthenticated invocations |
| Memory allocated (In Runtime, Build, Connections and Security Settings) | Keep it default |
| Autoscaling | Set the Maximum number of instance to 5 and then click Next |
[ View logs ]

✅ Monitor and Manage Google Cloud Resources
You need to:
- Create a Cloud Storage bucket and share with a second user.
- Create a Pub/Sub topic for the Cloud Run Function to send messages.
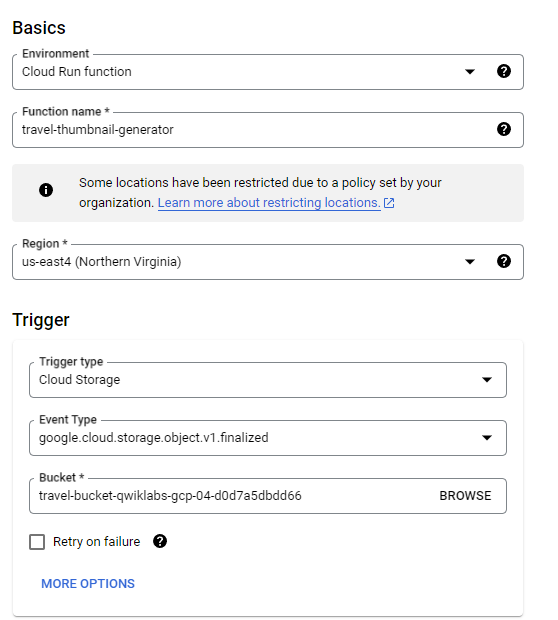
- Create a Cloud Run Function that executes every time a new object is created in the Cloud Storage bucket.
- Create an alerting policy to send a notification email about the number of active Cloud Run Function instances.
Task 1. Create a bucket

Task 2. Create a Pub/Sub topic

Task 3. Create the thumbnail Cloud Run Function
- Create a Cloud Run Function called travel-thumbnail-generator that executes every time an object is created in the bucket travel-bucket-qwiklabs-gcp-04-d0d7a5dbdd66 you created in task 1.
- Make sure you set the Entry point (Function to execute) to thumbnail and Trigger to Cloud Storage.
Note: You must upload one JPG or PNG image into the bucket to verify the thumbnail was created (after creating the function successfully).


Task 4. Create an alerting policy
- Create an alerting policy named Active Cloud Run Function Instances that notifies your personal email account when the number of active Cloud Run Function instances is greater than zero (0).
- For the metric, be sure to select Cloud Run Function > Function > Active Instances.
'Study > Cloud Computing' 카테고리의 다른 글
| [Cloud Security] Container Security (0) | 2024.12.07 |
|---|---|
| [Cloud Security] Introduction to Cloud Security (0) | 2024.12.02 |
| [Cloud] 쿠버네티스 실습 (0) | 2024.05.13 |
| [Cloud] 컨테이너 오케스트레이션과 쿠버네티스 (2) - 실습 (0) | 2024.05.02 |
| [Cloud] 컨테이너 오케스트레이션과 쿠버네티스 (1) (0) | 2024.05.02 |


